Friday, November 21, 2014

Red bean black rice paste

Last weekend, we used the e-processor that we bought from Mega Home to make red bean black rice paste for our family(baby, hubby and I).

Ingredients:
1. Red bean
2. Black rice
3. Water
4. Icing sugar
All ingredients are used without accurate measurement, just follow personal need and requirement, our red bean is more than black rice.

Instruction:
1. Boil red bean and black rice together until cooked, i didn’t use too much water to boil them. Amount of water just for red bean and black rice get cooked, they doesn’t need to be mashed.
2. After cook, then blend ingredient from number 1 with food processor, icing sugar can be added together if there for adult consumption, else only adding icing sugar at last if mummy minds to get their baby taking sweetened food.
3. If there is less water, the paste will be quite sticky. So more water (either boiled water or room temperature water) can add here until the paste is smooth.
4. The paste can be reboil when want to consume.

Overall, I quite satisfied with the end product, my baby didn’t show unlike face, but my hubby suggested it can get improved next time.


Red bean black paste for Samuel

Our red bean black paste

Monday, February 4, 2013

second round peanut cookies

After shared my peanut cookies with some friends and collected some comments from them, so I decided to have my peanut cookies a second try for improvement version.
 
Here are comments that I collected:
1. cookies are too big.
2. peanut taste too less.
3. peanut wasn't blended small enough.
 
Besides, I felt troublesome on removing peanut skin, so I decided to buy peeled peanut this time and this saved me a lot of energy and time.
 
Actually, making process was almost same with my first making, but I made some small adjustment on ingredients and make the cookie pieces smaller.
 
Here is my formula:
400g peanut
250g all purpose flour (I increase peanut quantity and reduce flour)
unmeasured peanut oil, I put it according to my hand feeling, it only needs to bind flour mixture together, I think I used less oil than last time.
about 50g corn stratch
around 200g sugar
1/2 teaspoon baking powder
1/2 teaspoon baking soda
1/4 teaspoon salt
1 egg
 
However, there is still some defect on my cookies after compare with my friend's. Frist, I thought my cookies are small enough until I saw my friend's because hers are smaller and cute, but I am satisfied with my size this time because it can be done within 1 bite. Second, my peanut flour is still not powdery and they still consider a bit rough, I think this is my food processor limitation, I might need to borrow my friend's blender for a try next time :)
 
My cookies before bake

Hot from oven

Comparison between my first and second batches

Cookies in bottles


Pineapple Tart Making

In my memory, peanut cookies and pineapple tart are two main chinese new year cookies, therefore I decided to make them this year. Between these two cookies, I think pineapple tart is more time consuming because I need to prepare for pineapple filling first, then only make the dough.
 
Here's my recipe.
 
Filling preparation:
Ingredients:
250g blended pineapple
150g sugar
1 table spoon lemon juice
 
Direction: put blended pineapple, sugar and lemon juice into a pot, cook the mixture until densed and in golden colour, leave them cool for use later.
 
Dough preparation:
Ingredients:
250g butter
375g all purpose flour
5 tablespoons corn stratch
3/4 teaspoon salt
3 tablespoons icing sugar
3 egg yolks
a little ice water
 
Direction:
1. Sifted all purpose flour, corn stratch and icing sugar twice, then add salt and put the flour mixture in fridge for at least 30 minutes.
 
2. Cut butter into small pieces and mix into flour mixture, mix them well with hand until like cookies crunch.
 
3. Mix in egg yolks slowly until mixtures are well mix. Add some ice water into mixture, and form a dough.
 
4. Put the dough into fridge for about an hour.
 
5.  Squeze a long surface out of a pineapple tart mould, put the prepared piniapple filling on the surface and roll it.
 
6. Brush egg mixture onto pineapple tart, bake them in preheat 170C oven for 15-20 minutes until them yellowish.
 

my pine apple tart 

Pineapple tarts in bottles

Wednesday, January 30, 2013

Peanut Cookies Making

Last week was long weekend holiday, we had five days off after taking off on Friday, I really enjoyed the holidays and have my Chinese New Year Cookie making over the weekend, peanut cookies was one of them.
 
I baked two batchs of peanut cookie, the first batch wasn't look nice because the cookies flatten and cannot have the normal peanut cookie's shape that we have during Chinese New Year, but which doesn't make me feel satisfation. So, I continue with second batch at night to adjust recipes according to my feeling and I finally have my peanut cookies in good shape though I think it was a little bigger than the cookies that I wanted, anyways it was correct recipes. However, I will try to improve my recipes next time by reducing some sugar and make the shape smaller.
 
Here is recipes that I got from internet.
 
Ingredients
140g peanut
140g cake flour (all purpose flour is good for this as well)
30g corn stratch
100g sugar (can adjust this according to personal favourite)
1/4 teaspoon baking soda
1/4 teaspoon baking powder
1/4 teaspoon salt
120g peanut oil (I adjust the quantity myself on my second try)
1 egg
 
Direction
1. Bake peanuts in oven until peanut's smell spread out, remove peanut's skin and blend them with food processor until it is powdery.
 
2. Put peanut powder, cake/all purpose flour, corn stratch, sugar, salt, baking power and baking soda into the mixing bowl to mix them evenly. Mix peanut oil together with flour mixture and mix them with hand evenly. (I tried to pour peanut oil slowly myself and feel firmness of mixture until I satisfied)
 
3. Make the flour mixture into small piece (follow the size you wish, I would prefer smaller) and put them on parchment paper to avoid cookies stick on pan.
 
4. Stir egg evenly and brush them onto cookies pieces. You may put on a peanut for decoration.
 
5. Bake them in 170C preheat oven for 15 minutes.
 
Tips:
Leave cookies cold on pan before remove them as they are too soft to avoid crack.

 
My failure product, taste is fine but shape doesn't meet my requirement

My well shaped product, but size is a little bigger

Tuesday, January 15, 2013

Toh Soon Cafe

Lately, we's like to search for Penang eateries and I found a famous cafe online, it was introduced by my friends few months ago but I forgot, this cafe visited by our Penang CM Lim Guan Eng, I think this is the reason makes it famous.
 
The shop should hard to find, it is located at a small lane along of Campell Street, when you are walking/driving along Campbell Street from the entrance gate, you just need to keep on looking to your left hand side. It should be on the first small lane on left, and there you can find a lot of people waiting to serve or standing by the table for their turn.
 
We arrived to the cafe at around 9:15am and there were a lot of people standing in queue to wait for their seat. Seeing so many people, SL asked me to decide whether wait or leave (I know he doesn't want to wait), and I choose to wait, it took about 30 minutes to wait for a table available for us, and there were people to come, their customers seem never stop.
 
Due to too many customers, waitress didn't really notice us and we waved to her for about 10 minutes until our order get placed, then there was another waiting period for our order served. While waiting for our order, we decided to have a pack of Nasi Lemak on table because YY recommended it, but I asked SL to choose the spoon carefully because I witnessed those spoons dropped by waitress accidentally to dirty land and she picked them up again to place on the table for customers collection. Anyways, I don't like their Nasi Lemak because it is too spicy to me.
 
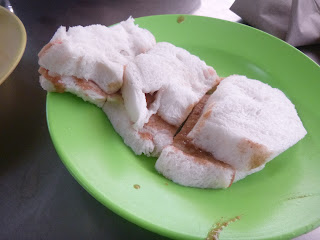
After about 15 minutes wait, our order served but they forgot my drink, I saw tables around us all were having steamed bread but I remembered YY told me they famous with toasted bread, I don't know what's happened with their toasted bread, but I had no complain since everyone takes steamed bread as well. We ordered a peanut butter and a kaya bread with two eggs, I think their peanut butter is quite special which is different with normal peanut butter. Their bread reminded me my young time because it is old time bread, it is not replacible by Gardiner or Hi-5. However, I don't really enjoy steamed bread because it tasted weird to me, I still prefer toasted bread.
 
In conclusion, we think their bread is just normal and we can't find any reason that makes them famous except it visited by CM Lim before.
Cafe detail:
Cafe name: Toh Soon Cafe (多春茶室)
Address: near to 184 Campbell Street, 10100 Georgetown, Penang.
Opening hour: 8am - 6:30pm (closed on Sunday)
 
Toh Soon Cafe
  
Nasi Lemak

Our peanut butter steamed bread
 
Our kaya steamed bread
 
Our eggs


Wednesday, January 9, 2013

creepe making

During New Year holiday, I don't want my Year 2012 ended with demotivated emotion and wished to spend my holiday more meaningful, therefore I decided to make creepe because I remembered creepe that we took at Humble Beginnings.
 
I learnt the way to make the dough for creepe from a friend's blog because she looked made a successful creepe. However, I didn't follow her way to make creepe's cream because I got some stock left in my freeze last time when I tried to make macarron.
 
Over all, my creepe tasted fine and SL like it, but I need to have some improvement next time to have it thinner, this actually is challenge because that need to make sure the creepe won't break during turn over the creepe.
 
Here is my recipe for creepe.
 
Ingredients
120g cake flour
10g corn stratch
2 eggs
30g fine sugar
450g milk
 
Directions
1. Sift cake flour and cornstratch together in to a large mixing bowl, then mix milk, eggs and fine sugar in to the mixing bowl and whisk them to be well mix.
2. Sift the flour mixture twice to separate unmixable part.
3. Heat a lightly oiled griddle or frying pan over medium high heat. Pour or scoop the batter onto the griddle, using approximately 1/4 cup for each crepe. Tilt the pan with a circular motion so that the batter coats the surface evenly.
4. Cook the crepe for about 2 minutes, until the bottom is light brown. Loosen with a spatula, turn and cook the other side. Leave it cold.
5. Repeat to cook until finish use of flour mixture.
6. Overlap creepe with prepared cream (jam can also be used here) every layer.
7. Put the prepared creepe into freezer to let creepe in position.
 
The cream that I prepared long ago

Flour mixture
 
Cook creepe with pan
 
Wrap the prepared creepe and rest in freezer
 
Oh, my creepe

Wednesday, January 2, 2013

Humble Beginnings

Few months ago, we went to Strait Quay for Popular Book Fair and I found a new cafe there for tea time, which called Humble Beginnings, they specialised in selling creepe, this is my first time to know this cafe. However, I found out recently in a friend's blog this brand actually existed for several years, but it started with online order and now they only newly operate a cafe in Strait Quay.
 
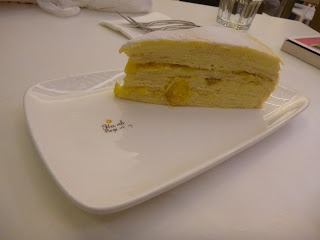
The cafe was quite full with people, I think a lot of people like creepe, and we only ordered a slide of mango creepe for tasting. Due to too many customers, waiter forgot our order and we waited for quite some time, this made SL unhappy.
 
After a while, waiter sensed SL's emotion and replace our order and offered to treat the creepe on cafe's bill, this made us felt less upset but we insisted to pay the bill ourselves as we understood they were busy.
 
For the mango creepe, I like its taste and it is soft, every layer is thin and meltable. If there is opportunity to return to Strait Quay, I would revisit the cafe for other favours.
 
Humble Beginnings Detail
Opening Hour: 12pm-10pm (cafe), 10am-7pm (phone order)
 
In front of Humble Beginnings

 
Humble Beginnings' Menu

Our mango creepe